

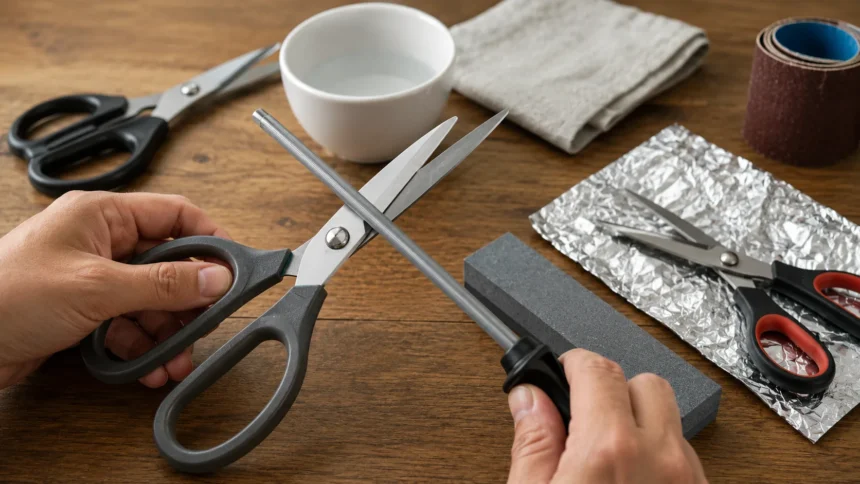
How to Sharpen Scissors at Home: 5 Easy Methods
Sharp scissors make everyday cutting easier, cleaner, and safer. When scissors become dull, they may fold paper instead of cutting it, snag fabric, crush packaging, or require excessive hand pressure. Fortunately, many ordinary household scissors can be sharpened at home without expensive professional equipment. A sharpening stone, fine file, abrasive paper, ceramic surface, or even folded aluminum foil can improve cutting performance depending on how dull the blades are. The key is maintaining the factory bevel rather than randomly grinding the cutting edge. With patience and light pressure, you can restore many pairs of scissors instead of replacing them.
Not every pair of scissors should be treated the same way. Standard kitchen, craft, office, and utility scissors are generally the easiest to maintain at home, while professional hairdressing scissors, pinking shears, serrated blades, embroidery scissors, and specialty shears often require professional sharpening. These tools may have highly specific bevel angles or blade shapes that are easy to damage. You should also inspect the pivot before sharpening because loose screws, rust, adhesive residue, or blade misalignment can make otherwise sharp scissors cut poorly. Sometimes cleaning and tightening the scissors solves the problem without removing any metal.
This guide explains how to sharpen scissors at home using five easy methods, along with preparation, blade-angle tips, safety precautions, maintenance, and common mistakes. You will learn how to sharpen scissors with a sharpening stone, file, sandpaper, ceramic surface, and aluminum foil, as well as when each technique works best. The guide also explains how to test your results and how to keep scissors sharp for longer. Whether your scissors are slightly dull or have stopped cutting cleanly, the following techniques can help you improve their performance without harsh grinding or complicated tools.
Why Scissors Become Dull
Scissors become dull because the thin cutting edges gradually wear down during normal use. Each time the blades close, they slide against one another while also contacting the material being cut. Paper, cardboard, fabric, plastic packaging, tape, and other materials place different amounts of stress on the edge. Over time, the metal may develop microscopic rounding or tiny burrs that prevent the two blades from meeting cleanly. Instead of slicing through material, dull blades may squeeze, tear, or push it aside. The change usually happens gradually, which is why many people do not notice how dull their scissors have become until they compare them with a new pair.
Cutting inappropriate materials can accelerate this wear. Fabric scissors, for example, can lose their clean cutting edge quickly when used repeatedly on cardboard, thick plastic, wire, or abrasive craft materials. Kitchen scissors may become damaged when used on bones or metal packaging that exceeds their intended strength. Office scissors can also suffer when repeatedly cutting adhesive tape because sticky residue builds along the blades and changes how they move together. Using each pair only for its intended purpose is one of the simplest ways to extend sharpness. Dedicated scissors for paper, fabric, kitchen use, and heavy-duty cutting generally remain more reliable than one pair used for everything.
Rust and corrosion can also affect cutting performance. Moisture left on kitchen scissors or garden shears can create rough spots along the blades, especially when the metal is not highly corrosion resistant. Even light surface rust can increase friction and prevent smooth blade contact. Cleaning and drying scissors after use therefore matters just as much as sharpening. If rust is limited to the flat portions of the blade, careful cleaning may restore movement without affecting the edge. Deep rust, pitting, or structural damage is more serious because sharpening cannot replace metal that has deteriorated extensively.
Pivot problems can make sharp scissors behave like dull ones. The pivot screw or rivet controls how tightly the blades press together during cutting. If the joint becomes loose, the blades may separate slightly and allow thin material to fold between them. If it becomes too tight, the scissors may feel stiff and difficult to operate. Before sharpening, open and close the scissors several times and check whether the blades move smoothly. Some models have an adjustable screw that can be tightened carefully. Proper tension is important because even perfectly sharpened edges need to meet correctly to cut well.
Physical damage can also create dents or chips that require more than light maintenance. Dropping scissors on a hard floor or cutting materials that are too tough can damage the cutting edge. Small imperfections may respond to a sharpening stone or file, but large chips often require more metal removal and accurate regrinding. Attempting to remove a deep defect at home can change the blade angle significantly. If the scissors are valuable, professional, or difficult to replace, professional sharpening may be safer. Home sharpening works best for routine dullness rather than major blade damage.
What to Do Before Sharpening Scissors
Start by cleaning the scissors thoroughly. Sticky residue can create enough friction to make a sharp pair feel dull, especially after cutting tape, labels, adhesive-backed paper, or food packaging. Wipe both blades with warm soapy water when the material allows it, then dry them completely. For stubborn adhesive, use a small amount of rubbing alcohol on a cloth if the manufacturer permits it. Keep liquid away from decorative handles or materials that may be damaged by alcohol. Once the blades are clean, test them again on ordinary paper or another suitable material. You may discover that cleaning alone improves performance significantly.
Inspect the blades under good lighting. Look for obvious chips, flattened areas, rust, bent tips, or uneven gaps between the blades. Run your eyes along the cutting edge rather than your fingers because even dull scissors can cause cuts. If one blade is bent away from the other, sharpening alone will not restore proper contact. Similarly, deep chips may require professional correction. Minor dullness appears more like a rounded edge than a visible defect. Understanding what is wrong helps you choose the least aggressive method necessary and avoids removing more metal than needed.
Check whether the scissors can be taken apart. Some household scissors use a removable pivot screw, allowing each blade to be sharpened separately. Disassembly can make it easier to maintain the correct angle because the entire cutting edge is accessible. Other scissors use a riveted pivot and should remain assembled. Do not force apart a joint that was not designed for disassembly. If you do remove the screw, keep track of washers or small components and note how tightly the pivot was adjusted before taking it apart. Reassembly affects cutting performance just as much as the sharpening itself.
Identify the existing bevel before touching the edge with an abrasive tool. Most standard scissors have one visible angled surface along the outer cutting edge and a relatively flat inner face where the blades meet. The sharpening tool should follow that existing bevel rather than creating a completely new angle. Holding the blade at a random angle can make the edge too thick or too fragile. If you are unsure, color the bevel lightly with a washable marker. A few gentle sharpening strokes will show whether you are contacting the entire bevel evenly because the marker will disappear from the areas touching the abrasive.
Prepare a stable work surface and protect your hands. A sharpening stone should sit securely on a non-slip base, while files and ceramic tools need controlled movement. Work away from children and pets and keep the blade pointed away from your body. Gloves can provide some protection, but they should not interfere with your grip. Slow, controlled strokes are safer and more accurate than aggressive grinding. Home scissor sharpening is not difficult, but it involves exposed metal edges and deserves the same attention you would give a kitchen knife or other cutting tool.
How to Sharpen Scissors at Home: 5 Easy Methods
Method 1 — Use a sharpening stone for the most controlled result. A fine sharpening stone or whetstone is one of the best options for ordinary household scissors because it allows you to follow the original bevel accurately. If the stone requires lubrication, prepare it according to the manufacturer’s directions. Place the beveled side of the blade against the stone at its existing angle and move the blade smoothly from the pivot area toward the tip. Use light, even pressure and repeat several times rather than pressing hard. After sharpening both blades, make one or two very light passes on the flat inner surfaces only to remove any burr. Clean the blades before testing.
Method 2 — Use a fine metal file for noticeably dull utility scissors. A small smooth or fine-cut file can remove more metal than a sharpening stone, making it useful when scissors have become substantially dull. Secure the blade carefully or hold it firmly on a stable surface, then place the file along the existing bevel. Push the file in one consistent direction from the pivot toward the tip rather than sawing randomly back and forth. Count your strokes so both blades receive similar attention. Stop frequently and inspect the edge because files can remove metal quickly. Finish with very light deburring on the inside face and clean away all metal filings before using the scissors again.
Method 3 — Use fine sandpaper or abrasive paper for light sharpening and edge cleanup. Choose relatively fine abrasive paper rather than very coarse construction sandpaper that could scratch the blades heavily. One technique is to fold the abrasive so the textured surfaces face outward and make several full cuts through it, using the entire length of the scissors. This can lightly clean and refine the edges but works best when the scissors are only mildly dull. For better control, you can lay the abrasive flat on a rigid surface and sharpen each bevel manually. Sandpaper is inexpensive and convenient, but it does not provide the same precision as a sharpening stone.
Method 4 — Use the unglazed bottom of a ceramic mug for a quick touch-up. Many ceramic mugs have a rough unglazed ring underneath that acts somewhat like a fine sharpening surface. Turn the mug upside down on a stable table and hold it firmly. Place the scissor bevel against the unglazed ceramic at the original angle, then draw the blade gently across the ring several times from base to tip. Repeat with the other blade and use only light pressure. This method is best for minor dullness rather than damaged edges. Clean both the mug and scissors afterward because a small amount of metal residue may remain on the ceramic.
Method 5 — Cut folded aluminum foil for a very light temporary touch-up. Fold a sheet of household aluminum foil several times to create a thicker strip, then cut through it repeatedly using long strokes that engage the full blade. This method can help remove tiny burrs and may make slightly dull scissors feel smoother, but it should not be considered true sharpening for seriously worn edges. Aluminum foil is much softer than proper sharpening abrasives and cannot reshape a badly rounded bevel effectively. Use it when scissors need a quick improvement before a craft or household task. For lasting sharpening, move to a stone, file, or another abrasive method that actually refines the metal edge.
How to Sharpen Scissors Correctly Without Damaging the Blades
Maintaining the original blade angle is the most important rule when sharpening scissors. The cutting edges are designed to meet at a specific geometry, and changing that geometry can make the blades stop contacting one another correctly. Instead of deciding on a universal angle, look at the bevel already formed by the manufacturer and follow it. Some scissors have wider bevels than others. A marker line along the bevel can help beginners see whether they are maintaining contact consistently. If the marker disappears only from the edge or only from the shoulder, adjust your angle slightly before continuing.
Sharpen from the base toward the tip in controlled strokes. This direction helps you maintain consistent pressure along the entire blade. Avoid grinding one small section repeatedly because doing so can create an uneven edge. Each pass should cover as much of the bevel as practical. If you are using a stone or file, repeat the same motion rather than switching directions randomly. Consistency matters more than speed. A dozen gentle, accurate strokes can produce a better result than several forceful passes that remove too much metal and change the blade shape.
The inside faces of scissor blades require very little abrasion. These surfaces slide directly against each other and must remain relatively flat. Grinding them aggressively can create a gap between the blades that prevents clean cutting. After sharpening the outside bevel, a tiny burr may form along the inner edge. Remove it with one or two extremely light flat passes using a fine stone or abrasive surface. Some people simply close the scissors gently several times after sharpening to help knock off microscopic burrs. The goal is burr removal, not creating a new bevel on the inside face.
After sharpening, clean the blades carefully. Fine metal particles and abrasive dust can remain on the surface and should not be transferred to fabric, food packaging, or other materials. Wipe the scissors with a clean damp cloth and dry them thoroughly. If the pivot feels dry, apply a tiny drop of suitable light oil and work the scissors open and closed several times. Wipe away any excess oil before testing. Proper lubrication reduces friction at the joint, which can make sharpened scissors feel noticeably smoother without requiring additional grinding.
Test the scissors gradually. Start with a plain sheet of paper rather than expensive fabric or important materials. Cut from the base of the blades all the way to the tips and observe whether the cut remains smooth throughout. If the scissors cut well near the pivot but fold paper near the tip, the tip area may still be dull or the blades may not be aligned correctly. If they snag at one specific point, inspect that section for a remaining burr or chip. Stop sharpening once the scissors cut cleanly because unnecessary additional passes only shorten blade life.
Which Sharpening Method Is Best for Different Scissors?
Ordinary office scissors are usually the easiest to sharpen at home. A fine sharpening stone, ceramic mug, or abrasive paper can restore most pairs that have become dull from cutting paper and lightweight packaging. If the scissors are inexpensive and only mildly dull, sandpaper or ceramic may provide enough improvement without requiring specialized equipment. Heavily worn office scissors can benefit from a stone or fine file. Always check the pivot first because inexpensive scissors often loosen over time. Tightening the joint may restore clean paper cutting even before sharpening begins.
Kitchen scissors can also be sharpened at home if they have simple straight blades. Clean them thoroughly first because grease and food residue can interfere with the process. A sharpening stone is generally the best choice because it provides good control and does not leave a heavily scratched surface. If the scissors come apart for cleaning, sharpen the blades individually and reassemble them afterward. Avoid using the scissors for food preparation until all metal filings and sharpening residue have been washed away. Specialty kitchen shears with serrated sections, bone notches, or unusual blade profiles may need professional service instead.
Fabric scissors deserve more caution because cutting accuracy is important. Standard dressmaking shears with smooth blades can be sharpened with a fine stone if you are confident about maintaining the bevel. However, expensive tailoring scissors are often professionally sharpened because removing too much metal or changing the set of the blades can permanently affect how they cut fabric. Never use fabric scissors on abrasive paper or cardboard simply as a routine sharpening technique. Those materials may provide a temporary effect while also accelerating wear. If the scissors are valuable and used for precision sewing, professional sharpening is usually worth the cost.
Hairdressing scissors should generally not be sharpened with casual household methods. Professional shears may use convex edges, hollow grinding, specialized tension systems, or extremely precise geometries. A ceramic mug, file, or coarse stone can destroy the edge and alter how the blades interact. Even if the scissors seem sharper afterward, they may push hair, fold strands, or develop premature wear. Professional sharpening equipment and training are designed specifically for these tools. The same caution applies to grooming shears used on pets when they have specialized blade designs. Home methods are better reserved for ordinary utility scissors.
Pinking shears, serrated scissors, embroidery scissors, and specialty craft tools also require extra care. Pinking shears depend on interlocking teeth that must align precisely, so sharpening them incorrectly can prevent the teeth from meeting. Serrated blades may require individual treatment of each groove rather than sharpening the entire edge flat. Small embroidery scissors have delicate tips that are easy to distort. If replacement cost is low, some people choose to replace these tools rather than risk sharpening. Higher-quality specialty scissors should usually be serviced by someone familiar with their blade geometry.
Common Scissor-Sharpening Mistakes to Avoid
The most common mistake is grinding the flat inner side of the blade aggressively. Scissors do not work like two ordinary knife blades. The inside faces need to slide closely against one another, and removing too much metal from them creates space between the blades. Once that contact is lost, thin materials may fold instead of cutting even if each edge feels individually sharp. Concentrate sharpening on the visible external bevel. Use only a very light flat pass on the inner face if you need to remove a burr. Preserving blade contact is more important than making every surface look polished.
Another mistake is changing the bevel angle. Beginners sometimes hold the stone too flat or too upright because they assume a steeper edge must be sharper. The scissors were designed around their original geometry, so recreating that angle is safer than inventing a new one. A dramatically steeper edge may become fragile and dull quickly, while an edge sharpened too flat may no longer meet the opposite blade properly. Follow the bevel that is already visible. When unsure, use the marker technique to confirm which part of the blade touches the abrasive during each stroke.
Using excessively coarse abrasives can create deep scratches and remove more metal than necessary. Coarse files and rough sandpaper have a place when repairing severely damaged utility tools, but they are too aggressive for routine household sharpening. Start with a fine or medium-fine abrasive and increase only when necessary. Metal removed from a blade cannot be replaced. The safest sharpening method is the one that restores cutting with the least material removal. Once the edge becomes clean and functional, stop. Continuing simply because additional strokes feel productive can actually reduce the useful life of the scissors.
Unequal sharpening is another common issue. If one blade receives twenty strong file strokes while the other receives five light passes, the geometry can become uneven. The blades may no longer meet correctly or may develop noticeably different bevel widths. Count your strokes and apply similar pressure on both sides. However, do not chase perfect visual symmetry if one blade clearly needs slightly more correction because of existing wear. The goal is balanced cutting performance rather than identical appearance. Test frequently so the cutting action determines when you are finished.
Finally, avoid sharpening scissors that are actually suffering from another problem. Loose pivots, bent blades, rust, dried adhesive, damaged handles, and misalignment can all make scissors feel dull. Sharpening cannot fix a blade that no longer touches its partner. Diagnose the problem first and correct cleaning or tension issues before removing metal. If the scissors are severely bent, cracked, deeply chipped, or structurally loose around the pivot, replacement may be safer. Sharpening should restore an otherwise functional cutting edge, not compensate for damaged construction.
How to Keep Scissors Sharp for Longer
The easiest way to keep scissors sharp is to use each pair only for its intended material. Reserve fabric scissors for fabric, kitchen scissors for food-related tasks, and office scissors for paper and light packaging. Cutting cardboard, wire, abrasive plastic, or metal with delicate scissors can dull or chip them quickly. Labeling handles can help households and workplaces prevent accidental misuse. Professional sewing rooms often protect fabric shears for exactly this reason. Sharpness lasts much longer when the edge regularly encounters only materials it was designed to cut.
Clean the blades after messy jobs. Tape adhesive, glue, grease, sap, and food residue increase friction and can make the blades feel dull even when the metal edge is still sharp. Wipe the scissors promptly rather than allowing sticky material to harden overnight. Use a cleaner appropriate for the blade and handle materials, then dry everything thoroughly. Kitchen scissors should be washed according to their care instructions and dried before storage. Preventing residue buildup reduces the frequency with which you feel the need to sharpen.
Lubricate the pivot occasionally when movement becomes stiff or squeaky. Place one small drop of light machine oil at the joint, open and close the scissors several times, and wipe away excess. Do not flood the pivot because oil can attract dust or transfer onto materials later. Kitchen scissors may require a food-safe lubricant if oil could contact food, so check the manufacturer’s recommendations. Smooth pivot movement helps the blades maintain proper contact while reducing unnecessary hand pressure. Many apparently “tired” scissors improve noticeably after cleaning and lubrication.
Store scissors in a dry place where the cutting edges are protected. Throwing them loosely into a drawer with screwdrivers, metal tools, and other hard objects can nick the blades. Use a sheath, dedicated drawer section, magnetic tool holder, or protective case when practical. Keep expensive craft or sewing scissors away from humid areas that may encourage corrosion. Close the blades before storage unless the manufacturer specifies otherwise. Proper storage protects both the edge and anyone reaching into the drawer.
Sharpen lightly before the scissors become extremely dull. Regular touch-ups with a fine stone require much less metal removal than waiting until the blades barely cut. If you notice paper starting to snag or fabric requiring more effort, inspect and clean the scissors first, then perform a gentle sharpening if necessary. Small maintenance sessions are easier to control and less likely to alter blade geometry. Professional scissors should follow the maintenance schedule recommended by the manufacturer or sharpener. Consistent care usually provides better results than aggressive restoration after years of neglect.
Conclusion
Knowing how to sharpen scissors at home can save money and restore many ordinary pairs that would otherwise be discarded. The safest and most effective method is usually a fine sharpening stone because it provides good control over the existing bevel. A file can help with more noticeable dullness, while sandpaper and ceramic surfaces offer convenient touch-up options. Folded aluminum foil can improve minor burrs or roughness but should be treated as a temporary refinement rather than a substitute for real sharpening. Matching the method with the condition of the blade produces better results than using the same trick on every pair.
Preparation matters just as much as sharpening. Clean off adhesive and grease, inspect the blades for damage, check the pivot tension, and determine whether the scissors can be separated safely. Many cutting problems come from dirt, loose joints, or misalignment rather than a worn edge. Sharpening a pair that only needed cleaning removes metal unnecessarily. Once you confirm that the blades are genuinely dull, follow the visible factory bevel and work slowly. Light, controlled strokes provide more precision than forceful grinding and reduce the chance of permanent damage.
The inside faces of the blades deserve particular care. They need to remain flat so the two cutting edges meet closely during each stroke. Sharpen primarily on the outer bevel and use only minimal abrasion inside to remove a burr. After sharpening, clean the blades, lubricate the pivot if needed, and test using plain paper before moving to valuable materials. A good result should cut cleanly from the pivot to the tip without folding or snagging. Stop sharpening as soon as the scissors perform well because additional metal removal offers no useful benefit.
Not every pair belongs on a home sharpening bench. Professional hairdressing shears, pinking shears, serrated scissors, high-end tailoring tools, and specialty blades can have complex geometries that require dedicated equipment. Attempting to sharpen these with a file or household ceramic surface can make them worse. Professional sharpening is usually a better investment when the scissors are expensive or precision matters. Home methods are most appropriate for ordinary office, kitchen, craft, and general-purpose scissors with straightforward smooth blades.
The best long-term strategy is preventing excessive dullness. Use scissors only on appropriate materials, clean the blades after sticky jobs, keep the pivot moving smoothly, and store them away from other metal tools. Occasional light sharpening is much easier than repairing severely rounded or chipped edges. With the right technique and a little patience, many household scissors can remain useful for years. A controlled sharpening routine restores performance without sacrificing the blade shape that allows the scissors to cut properly in the first place.
Frequently Asked Questions
What is the easiest way to sharpen scissors at home?
A fine sharpening stone is one of the easiest and most reliable methods because it lets you follow the original blade bevel accurately. For very light dullness, a ceramic mug or fine abrasive paper can provide a quick touch-up.
Does cutting aluminum foil really sharpen scissors?
Folded aluminum foil can remove tiny burrs and make slightly dull scissors feel smoother, but it does not provide the same true sharpening effect as a stone or file. It is best used as a light temporary touch-up.
Can you sharpen scissors with sandpaper?
Yes, fine sandpaper or abrasive paper can improve mildly dull scissors. Fold it with the abrasive sides facing outward and make several long cuts, or use it flat to sharpen the existing bevel more precisely.
How do you know when scissors are sharp enough?
Test them on ordinary paper using the full length of the blades. Sharp scissors should cut smoothly from the pivot to the tip without folding, tearing, or pushing the paper away.
Should expensive scissors be sharpened at home?
High-end tailoring scissors, hairdressing shears, serrated scissors, and pinking shears are usually safer with professional sharpening. Their specialized blade angles and shapes can be damaged easily by ordinary household sharpening methods.